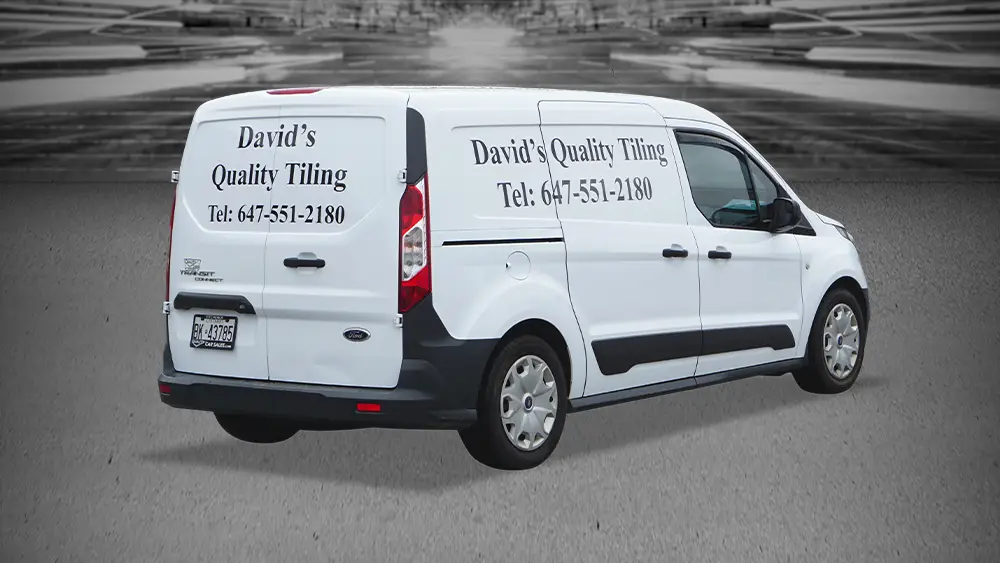
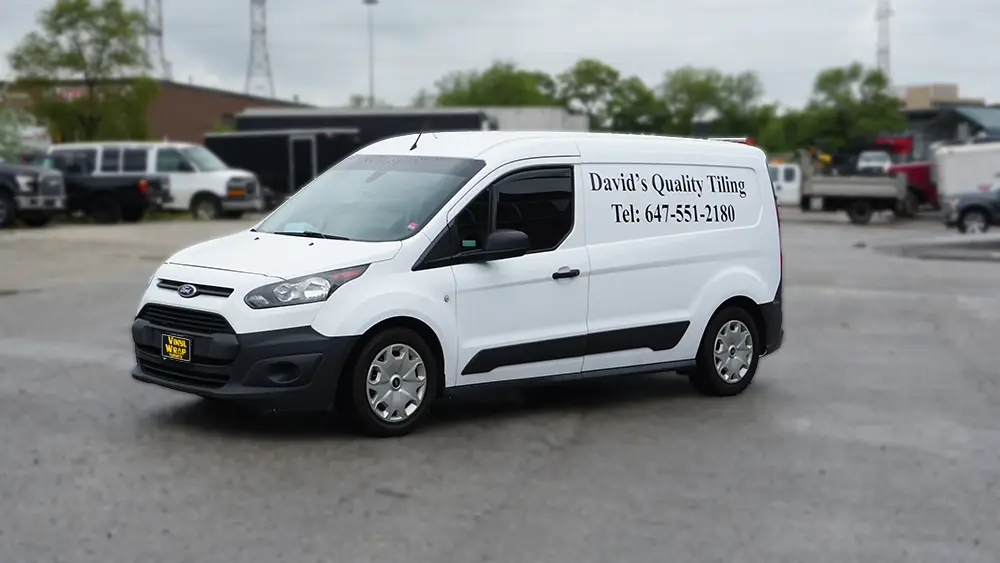
Vinyl wraps and decals are a great way to advertise your business or personal brand. They are cost-effective, versatile, and can turn your vehicle into a mobile billboard. At Vinyl Wrap Toronto, we specialize in custom vinyl wraps and decals, and recently, we had the pleasure of installing 3M Promotional Lettering and Decals on a Ford Connect for our client David’s Quality Tiling. In this blog, we will take you through the installation process and share some tips on how to get decals and lettering on a Ford Connect.
Step 1: Preparing the Vehicle
The first step in any vinyl wrap or decal installation is to clean the surface thoroughly. We began by washing the Ford Connect with soap and water, followed by deep cleaning with isopropyl alcohol. This is an essential step as any dirt, dust, or debris on the surface can affect the adhesive properties of the vinyl.
Step 2: Designing the Lettering and Decals
Before we could install the decals, we needed to design them. Our client provided us with their logo and branding guidelines, and our in-house design team created custom decals that fit their brand perfectly. Once the design was approved, we printed the decals using high-quality 3M vinyl.
Step 3: Applying the Lettering and Decals
Applying the decals is a delicate process that requires patience and attention to detail. We began by measuring and positioning the decals on the vehicle, making sure that they were centered and aligned correctly. We then used a squeegee to apply the decals to the surface, starting from the center and working our way outwards. This helps to eliminate any air bubbles and ensure a smooth finish.
Step 4: Finishing Touches
Once the Lettering and Decals were applied, we trimmed off any excess vinyl using a sharp blade. We then heated the vinyl with a heat gun to activate the adhesive properties and ensure that it bonded securely to the surface. Finally, we used a squeegee to smooth out any remaining air bubbles or wrinkles.
Tips for Installing Lettering and Decals on a Ford Connect
- Take your time: Rushing the installation process can lead to mistakes and affect the overall quality of the finished product.
- Use high-quality vinyl: Cheap vinyl may save you money upfront, but it can peel, fade, or crack quickly, requiring costly repairs or replacements.
- Clean the surface thoroughly: Any dirt, dust, or debris on the surface can affect the adhesive properties of the vinyl, leading to peeling or bubbling.
- Use a squeegee: A squeegee is an essential tool for applying vinyl decals, as it helps to eliminate air bubbles and ensure a smooth finish.
- Heat the vinyl: Heating the vinyl with a heat gun can activate the adhesive properties, ensuring that it bonds securely to the surface.
Conclusion
At Vinyl Wrap Toronto, we take pride in delivering high-quality vinyl wraps, Lettering and decals that help our clients stand out from the crowd. The installation of 3M Promotional Lettering & Decals on a Ford Connect for our client David’s Quality Tiling was a success, and we hope that our tips and insights will help you achieve the same results for your next project. Remember, taking your time, using high-quality materials, and paying attention to detail is essential to a successful installation.
Get an Estimate:
- Fill out the form
- Call us at 416-746-1381
- Get Directions (opens in new tab or maps app)
Credits:
- Lettering and Decals Designed By: Branding Centres
- Ford Connect Vehicle Outline By: Wrap Authority